Wright Balance® 1992 - 2025: A 30 Plus Year Summary of Balance Research & Application (WEB 1 AA)
Copyright, Wright Balance® 2024
Wright Balance® Research
"All that we don't know is astonishing. Even more astonishing is what passes for knowing." - Philip Roth
Experience is the measurement of TRUTH
Nature knows no right or wrong, only balance and imbalance
1992-1999
I observed hip rotation and posture changes in players after they placed their hands on a club during golf schools in 1992. I began looking at different grip sizes to see if that would impact posture and hip rotation. I noticed both posture and hip rotation changes but still wasn't certain whether larger or smaller grips were indicated.
I recalled that Harvey Penick recommended using a yardstick when practicing grip. So, I had 15 plexiglass strips made in the shape of a yardstick with different thicknesses and began testing grip sizing.
I am testing the grip size using one of the plexiglass strips in the following illustration noting hip rotation, posture and heel to toe balance from an open stance. This photo was taken in 1995.

Champions Tour player Bob E Smith is shown in this photo with his playing grip size.

Note Bob's posture and hip line changes when he took a grip that was too small for his hands.

Bob is checking his putter grip size in this photo. Note that he is set up in a closed stance. However the handle size has created open hip and shoulder lines.

I began to measure hand size with a focus on the middle finger. The middle finger proved to be the primary measurement of grip size. Initially the middle finger was measured manually using a laminated page with lines 10 thousandths of an inch apart. This image shows that measurement.

A hand measurement system was developed by Wright Balance engineer, Alvin Veroy in the late 90s. The player placed their hand on a plexiglas "box" with a high resolution camera mounted on the base. The camera was calibrated so that it provided an accurate grip size to within 15 thousandths of an inch. This photo shows one of the first hand measurement system

Grip size testing advanced to a dynamic test by having the student swing to the top of their swing. I stood behind the student and applied pressure on the shaft in the downswing plane. If the grip size fit, I was NOT ABLE to budge the player as shown here.

When the grip size DID NOT fit, I was able to push the player over with very little effort.

Measurement of Pelvic Rotation
In the mid 1990s I observed that all players have some degree of pelvic rotation. Working with physical therapists, we designed a measurement system to assess that rotation.

The next version of the measurement tool added a metal protrusion as an indicator of the amount of pelvic rotation and a platform with zero to 7 on the left and ride side. The player would stand on a platform, zero out the measurement tool and then relax and allow their hips to remain as they are or rotate. We measured the rotation amount by noting the deflection of the measurement tools on the numbers on the platform. The following is PGA Tour Veteran Patrick Burke in the early 90s testing our first prototype.


The measurement tool became more sophisticated over time.
and I measured both hip and shoulder rotation using a laser that marked the platform noting the amount of shoulders and pelvic rotation.

Power Spots
Power Spot is a name that I coined in 2014. These spots match the Core Zone. Pressure on these spots impacts balance as described in this EBook.
Application of Pressure & the Propagation of Force: An Explanation (updated January 2024)
https://instructions.wrightbalance.com/how-power-spots-create-propagation-of-force/
This propagation of force is the foundation for determining the dominant Core Zone without measurements and determining grip size in the latest 5 subregions.
Biomechanics Research
2000-2007
A multi-year study was conducted with elite golfers from 2000-to 2007 in Dr. Frank Jobe's biomechanics lab at Centinela Hospital in Los Angeles, CA. Each subject had 40 light sensors attached to precise anatomical landmarks on their body.
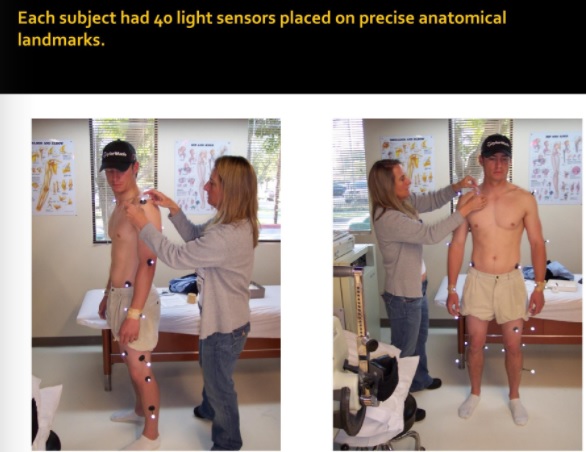
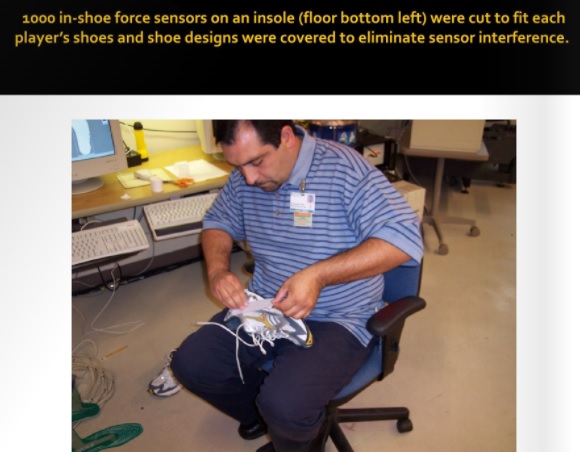
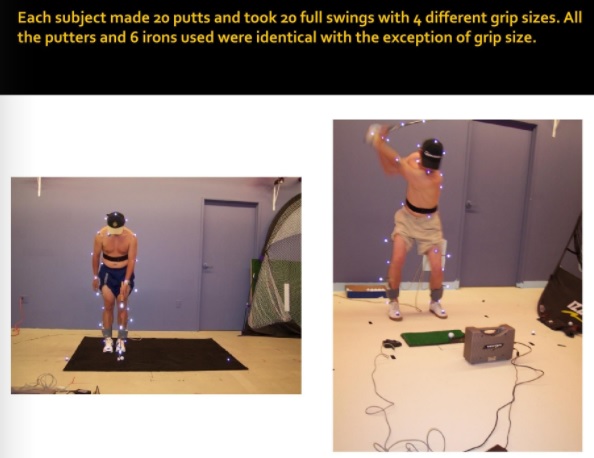
Additionally, each subject had an insole cut to fit their shoes with 1000 force sensors in each shoe. The entire study was about balance and grip size. Each subject was tested in 75 different set up positions with and without a club. Following the "static" measurements of set up, each subject hit 20 balls with four different grip sizes and 20 putts with four different grip sizes.

Stance Width
The biomechanics lab protocol called for changing stance width in 3 positions, "normal", 2 inches wider and 2 inches narrower than the player's "normal" set up. It was immediately noted that as stance widths changed the amount of pelvic rotation increased or decreased.
This measurement system culminated in the use of light sensors on dowel poles that were used in the biomechanics lab. A bar with light sensors was placed on the pelvic and shoulder lines.


Over several years, subsequent to the biomechanics lab research, When I explored the light sensors on the body and the force sensors in the shoe for a straight line of force. I began to see a pattern in the body width data. I reviewed these data in detail in subsequent years.
BALANCE CAPTURE CONSIDERATION
Please note the lined mats on which the player is standing when the balance captures were made. It is imperative to have a line for the player / subject to stand for both research and training. This image shows a later version of a black lined mat. Note that the students feet are on the same line.

I began looking at the line of force in the original balance studies from the early 2000s. During the pilot study, in preparation for this research, I noted that when a lined mat was not used, the line of force was often a diagonal line due to players having one foot behind the other.
By 2010 I was able to determine that the body width measured at the lower sternum and the widest part of the body from the outside edge of one arm to the outside edge of the other was a predictor 100% of the time of a pattern of numbers that matched the Core Zones. These numerical patterns resulted in a Fibonacci sequence. Interestingly, Fibonacci numbers are the foundation of the current 5 subregion stances for exercise and for determining grip size without hand or body measurements.
Carrying Angle
The carrying angle was a standard measurement in every subject. Dr. Michael Mellman brought the carrying angle measurement to the research setting.

The carrying angle is from 1865 medicine where it was used as a measure of forearm health. The original measurement was describe as a continuous measurement of the upper arm through the forearm. I mistakenly began measuring the carrying angle 90 degrees to the ground. It was a fortuitous error as it turned out.
The measurement of the carrying angle 90 degrees to the ground became a gold standard of Wright Balance®. Research shows, when the forearm angle is measured 90 degrees to the ground, that is the angle of range of motion through the body and it changes by Core Zone.
The carrying angle is ALWAYS the angle of the thigh at address when the player is in balance.

After the Wright Balance Express exercise, if you give your student a heavy weight to hold across their chest, that weight will set their posture. Out of that posture, the thigh is ALWAYS equal to the carrying angle when the thigh angle is measured 90 degrees to the ground.
In the following photo taken in 2011, I am measuring Legends Hall of Fame Player, Sandra Palmer's carrying angle.

In this photo, Sandra has taken a dowel pole with weight attached to the center of the pole and she is holding it across the center of her chest. When the posture is set, the player has maximum shoulder rotation.

The carrying angle shows up in multiple angles at address, repeats at the top of the swing and continues through impact to finish. This illustration shows the measurement of the carrying angle with a digital protractor...

...and this illustration shows one of 3 repeating positions at the top of the swing.

When the club is gripped with matching Core Zone stance widths and Power Spots, the player will set the carrying angle at the top of the swing. When resistance is placed on the downswing plane on the butt of the grip, the player cannot be moved off balance. Note the power shown in this illustration.

When one of the variables of the player's Core Zone did not much (stance width or matching power spots), the player could be easily moved off balance.

During this time, players had 5 to 7 stance widths in each Core Zone they could use. When a player's stance width did not match their playing Core Zone, they could easily be moved off balance.
Following body measurements, the player and Wright Balance professional were emailed their results for Stance Widths. This illustration is from the printout of stance widths for a Lower Core (Posterior Zone) player.

The following illustration shows all 3 Core Zone stance widths.

Upon receipt of the stance width results, the player was given an alignment stick with their playing Core Zone stance widths marked as shown here.


Reverse Engineering the Carrying Angle
I had an article in Golf Magazine reverse engineering the carrying angle of Lee Westwood in a swing sequence showing a few of the many repeating angles equal to his carrying angle.


Each of the blue lines in these illustrations is drawn to be 155 degrees with the exception of the down the line image of the forearm and shaft. Those two connected lines equal 155.
Interestingly, I determined that a Carrying Angle of 155 to 157 degrees was the ideal carrying angle for a Middle Core (Interior Zone) player. Lee Westwood fits the Middle Core (Interior Zone) player
Wright Balance® can now change the Carrying Angle through a one (1) minute exercise. This process was accomplished after hundreds
The Carrying Angle, center of mass and lead knee at the top of the swing. This EBook provides a summary of the Carrying Angle by Core Zone. You will find the Carrying Angle information at the end of the Tour Player illustrations for each Core Zone.
https://instructions.wrightbalance.com/stance-width-ranges-by-core-region/
Force Sensors and Line of Force
Below is an image of the what the 1000 force sensors showed.

The line of force was defined as a connection between the Center of Force of one foot to the Center of Force of the other foot.
As noted, each subject hit 20 balls and 20 putts with 4 different grip sizes.
The results showed that the line of force predicted the putter path 100 % of the time and the downswing path 100% of the time. Below are examples of that process.
Over time, the line of force for putting and full swing showed a predictable pattern at impact. This illustration, for a right handed player, shows an outside - in path with the putter and, in the full swing, a steep approach to the ball, a "heavy" left shot. The light sensors showed an open hip line 100 % of the time.

The following configuration shows a illustration of an inside-out path with the putter and in the full swing, a shallow approach to the ball resulting in a "thin" shot and a likely push or draw. The light sensors on the body showed a closed hip line 100 % of the time. This closed hip line resulted in the player's perception of being "stuck" sensation through impact creating a "flipping" sensation as the body stopped and the arms and hands continued in the swing.

The original Centinela biomechanics lab research resulted in multiple articles and spurred on further research. This is the title page of one of the articles where an exercise program was tested to determine the impact on pelvic rotation.

The exercise tested was from Dr. Robert Watkins, spine surgeon to the PGA Tour and elite athletes. Dr. Watkins had a series of exercises he would provide patients who were pending back surgery. Dr. Watkins believed that 95% of back surgeries are unnecessary and could be avoided IF the patient would follow a simple core strengthening exercise.

Below is an image of Colin Montgomerie in 2018 doing the exercise tested in the lab. He arrived for a putting lesson and I put him through the core exercise program from the biomechanics lab research. Note in this photo that he is laughing saying: "I don't know what this has to do with putting..."

I used these exercises in my Wright Balance golf schools for several years.

The next exercise evolution was using the 9 stance widths to square the core while the player was on their knees. They placed the width of their knees on each of the 9 stance widths and held each position for 1 minute. That exercise as shown in this photo from a Mazatlan, Mexico golf school in 2015.

The following image is also of the "knee plank" exercise in the 9 stance widths taken in Mission Viejo, CA in 2012.

That exercise evolved in 2017 to doing planks using the 9 Stance Widths to square the Core as shown in this photo.

In 2018, Wright Balance began testing the use of the handle size paired with the 9 Stance Widths. The following illustration was done by Mathieu Paradis of Quebec City, Canada in both English and French.


Stance Width and Balance Observations
During the research phase in Dr. Jobe's biomechanics lab there were a number of changes observed when the research protocol called for changing stance width from what felt comfortable to the player to 2 inches wider and 2 inches narrower.
It was observed that as stance width changed, the way the arms and hands hang also changed. When there was a straight line of force, it was noted that the arms and hands would hang the same as shown here.

Every player was different.
Note: I was able to accomplish these same changes in how the arms and hands hang with placement of tape on the fingers in early 2023. Once rings are removed from the hands and tape was placed on the fingertip of one hand and the power spot of the dominant zone of the other hand, I was able to create balance where the hands hung at the players side 100% of the time in all stance widths. That phenomena was researched using the *Smart 2 Move *balance plates**by Wright Balance Professional George Puchinsky.
Shoulder and body width were also part of the measurements taken of each subject in the biomechanics lab.


These measurements translated to a series of stance widths by each Core Zone that, when all stance widths were combined, It was a Fibonacci sequence.
These measurements resulted in 5 to 7 stance widths for each individual where a player could play in balance. These stance widths were placed on an alignment stick and marked for the player to practice.
Stance Width and Clubface
PGA and European Tours Veteran and European Ryder Cup Captain, Colin Montgomerie is shown in these photos with a putter. In the first photo, Colin, an Upper Core (Anterior Zone) player is standing at 16 inches, one of his balanced stance widths. Note the square clubface.

Colin changed his stance width from 16 inches to 17 inches. Note the club face closed when he changed his stance width.

2010- 2015
A putting Instruction book was published by Golf Magazine in 2010. I had a chapter in that book. The following is an illustration of a page from that chapter describing the impact of handle size on path.

Handle size and the carrying angle were translated across multiple sports as shown in this Golf Magazine article in 2011.

Between 2006 and 2016, I defined 3 Core Zones with 3 subregions in each Zone shown here.


Stance Width became predictable based upon body measurements.
HeeL to Toe Balance
PGA Tour veteran, Dennis Paulson is shown in the images below demonstrating changes in face position based upon heel to toe balance. Notice when Dennis moved his weight toward his toes, his clubface closed and as he moved his weight toward his heels, his clubface opened.


Grip Size Measurement Progression
As noted above, I began to look at grip size in the early 90s. The following image, also shown above, was used to measure the middle finger of the lead hand and arrive at grip size. These results, 47 as shown here were translated to grip size measured to the middle finger of the top hand on the grip. Industry standard for measuring grip size 2 inches down on the butt of the club. However, if a player grips down, like Anthony Kim, a standard of 2 inches from the butt of the club for grip sizing would not fit Anthony. When the top or lead hand is measured to the middle finger, it is generally 3 plus inches from the butt of the club.
Our Wright Balance engineer designed a Plexiglas "box" where the player placed their hand as shown in this illustration. There was a high resolution camera mounted in the base of the "box" that took an image and provided results in less than 5 seconds per hand as shown in these illustrations.
When the body measurements were added to the program, the printout provided stance widths as well.

The computer model provided precise measurements. However, the costs for the hardware (hand measurement "box") with the high resolution lens was prohibitively expensive. Ultimately, there were 10 or 12 of these systems in the US, Asia and Europe. We needed to find another inexpensive way to determine grip size.
This video shows LPGA Tour player Anne Marie Palli with me demonstrating a simpler way to determine grip size. Once I had the Core Zones identified in stance widths, I used the stance widths of each zone to fit the 3 different grip sizes as shown in this video.
During my initial observation of grip size, I believed that a grip size that did not fit created pelvic rotation. It does not. The strength or weakness of a grip is what creates pelvic rotation. I have demonstrated that by eliminating pelvic rotation and then testing handle size. Handle size, as you will see in this video creates changes in heel to toe balance.
As heel to toe balance changes so does the way the player uses the ground
Wright Balance® Ground Reaction Force Research
Wright Balance Professional and Neurologist, Dr. Robert Giombetti conducted a study using the Wright Balance measurement system to determine the dominant Core Zone. He then used a Swing Catalyst to gather data on how each Core Zone used the ground. He presented the results of this research at a neurology convention. This EBook shows the results of Dr. Giombetti's study.
https://instructions.wrightbalance.com/motion/
At the time this EBook was written, Dr. Giombetti had completed 200 subjects and the majority were males. Please keep that in mind as the majority of females are Middle (Interior Zone) and Lower Core (Posterior Zone) He found that the Upper Core (Anterior Zone) players use the ground rotationally and vertically; the Lower Core (Posterior Zone) players use the ground rotationally and linearly; the Middle Core (Interior Core) players use the ground rotationally, linearly, and vertically.
An injury that impedes the ground reaction force can be bypassed by moving the Core Zone from one Zone to another.
2021-2024
By 2021 the Core had been redefined on both the horizontal and vertical plane as having 3 Zones with 3 subregions in each Zone. This short video is a 3D animation of the 3 Zones.
And the following is an illustration of the Anterior, Interior and Posterior Zones

In 2022, the 3 Zones were broken down further showing the 3 sub-regions of each Zone. If you enlarge your screen, you will see the 3 sub-regions of each Zone on the vertical plane.

As these Zones were being defined, the Wright Balance® 4- Way Express and the relationship between handle size and Stance Width, use of tape on the fingers and left to right Core training was discovered.
I also determined that each person has a "dominant" Zone where their life's physical load resides. Within that Zone, there was one dominant subregion for each Zone. That subregion was the only one of the 9. Each Core Zone, when an elite player was in balance, showed a defined balance configuration.
The Upper Core (Anterior Zone) player was forward on the balls of their feet as shown in this illustration.

The Lower Core (Posterior Zone) player was over the center of the arches as shown in this illustration.

The Middle Core (Interior Zone) player was between the center of the arches and balls of the feet as shown in this illustration.

In 2017, Using a Swing Catalyst with a single plate, another study was initiated by Wright Balance Professional and Neurologist, Robert Giombetti, MD. The following EBook summarizes the results of Dr. Giombetti's research.
https://instructions.wrightbalance.com/grip-ground-reaction-force/
Finding the Dominant Core Zone Without Measurements
June, 2023 in Seoul, South Korea I was speaking for two days to 85 KLPGA professionals. I did a "strength" test to see if the dominant Core Zone could be determined using the power test you used in the January 2024 training. I was speaking for two days to 85 KLPGA professionals. The Smart 2 Move China representative attend and we were able to simultaneously observe changes on the force plates in several of the KLPGA professionals.
The Pilot Study
Tape was applied to one fingertip of one hand and the Upper Core Power Spot of the other hand as described in the propagation of force summary above. The Power Test determined dominant Core Zone for the 85 KLPGA professionals 100 percent of the time.
The Research,2023-2024
Smart 2 Move (S2M) staff provided dual force plates for the research. I wrote the protocols and George Puchinsky ran the research in Fort Myers, Florida. The goal was to test 40 players. There were 8 captures per subject. The strength test once again was accurate in all of the subjects.
There were 3 distinct patterns as a result of the testing. When one fingertip was taped and the subject showed strength only when the Upper Core power spot was taped and limited power was demonstrated when tape was applied to the Middle Core or Lower Core Power Spots.
Below is a sample of the observed changes for the players whose power was demonstrated when the Upper Core Power Spot was taped. The following is before and after taping.
The New 15 Core Zones circa 2023
During the 2023 discovery of determining the Dominant Core Zone without measurements, I discovered an additional 2 subregions in each of the 3 Core Zones. Here are illustrations of the 15 core subregions in the Horizontal Plane.


Note that the 3 Core Zones (Upper, Middle & Lower) subregions are numbered 1 through 5 each. That order reflects the changes experienced in carrying angle and foot strike when walking or running. Each subregion produces a different carrying angle and foot strike when using handle a handle size and stance width that matches the trained subregion.
There is a vinyl strip with 15 subregions used by Wright Balance® Professionals when "fitting" a person. That strip is proprietary and not available to the public at this time (April, 2024).
The 8 Position Wright Balance® Express in One Stance Width Circa 2024 & 2025
The 8 Postion Wright Balance® Express in One Stance Width was tested in the Summer of 2024 and introduced to Wright Balance® Professionals in late fall of 2024. The following is an EBook link to a summary of the kinetic chain, the misalignment of the body prior to & after the Wright Balance® Express and a video demonstrating how to do the Wright Balance® Express.
https://instructions.wrightbalance.com/the-wright-balance-express-the-kinetic-chain/